
When it’s your best friends birthday you make a cake, even if she doesn’t want one. For my dearest and most wonderful friend, I made a passion fruit flavoured melon cake and in the end she loved it. Happy … Continue reading

When it’s your best friends birthday you make a cake, even if she doesn’t want one. For my dearest and most wonderful friend, I made a passion fruit flavoured melon cake and in the end she loved it. Happy … Continue reading
Hello there. Long time no see! I wish you all a merry Christmas and a happy new year! It’s cruel, how time flies… I was busy with an internship, my thesis (126 pages: O), (dreadful) interviews and my last papers and seminars at uni. Sadly, I cannot promise to be better from now on, because I am still in the middle of graduating. But, I’ll try. Hard.
This post will fill you in on what I have done baking-wise, which was not a lot. At all. Nevertheless, I hope you enjoy it.
Vegan Experiments
Sometime in September, I made some vegan recipes to challenge myself and, because I tried to be vegan for a month. Baking vegan is actually not too complicated since there are easy substitutes for almost everything. Being vegan however, was just exhausting. I spent hours reading the small prints on packages (the amount of products containing lactose is just too damn high) and if you don’t like to eat processed foods with enormous amounts of palm fat in it, you really have to spend a lot of time preparing food (with all the graduating stress going on, this is something I’d like to avoid).


So, this was the first vegan pie I made. It is “raw” (whatever that means exactly). If you like pumpkin pies, this is definitely worth trying. If you ignore the sugar in it, you could almost say it is healthy. I have no idea, why the whipped coconut cream looks curdly, though. Please tell me if you know why!
Recipe: Chocolate Mousse Pie with Peanuts and Pretzels

The second vegan bake was a chocolate, peanut and pretzel pie. I liked this one very much because of its sweet and salty contrast. It is quite heavy…healthy for the soul.

Graduation Cupcakes
Two of my friends graduated, so they each got a graduation cupcake. These are raspberry filled white chocolate cupcakes with coconut and a tiny fondant mortarboard. Isn’t it adorable? :)
Congratulations you two!
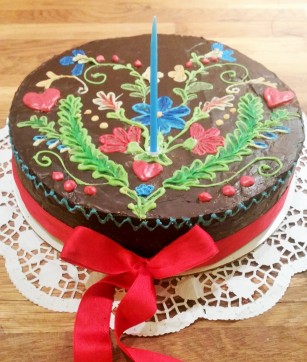
Birthday Sacher Torte
Sacher Torte can be both dreadful and very delicious. When I was in Vienna, I ate a very dry and tasteless slice at the Sacher Hotel. Maybe the baker had a bad day, because I loved this one (Recipe: Sacher Torte). Even though the glaze did not work at all (I think the original glaze is made with syrup and chocolate) and I had to substitute it with pure chocolate, I really like the recipe. The cake was moist and light and chocolaty.
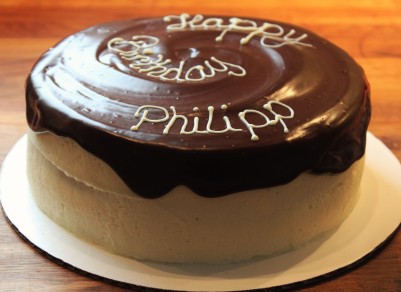
Delayed Birthday Cake
This birthday cake was given to the birthday-boy after guilt-tripping me into baking one, nine months after his actual birthday. Even though it looks quite nice, I was really unimpressed with the recipe and therefore will not share it. But I promise to keep on searching for the perfect banana, chocolate, cream cake!
Very Sexy Swedish Buns


Oh Jamie, you have never disappointed me! There is no one I trust more when it comes to recipes. I made those buns, just for fun and they turned out perfectly.
The blueberries and cardamom, the very rich dough… I am telling you, bake them. Do it! Now! But please wear gloves… my hands looked terrible afterwards.
PS: eat them when they are warm. hmmmm.
Beer Bread


Jamie Oliver’s recipe, again. This bread is fluffy, tastes just a little bit like beer, and is super easy to make. You just need to substitute the water from the basic bread recipe with beer. Next time I will add some caramelized onions to the dough. I think the result will be perfection!
Because I don’t have time to travel around the world, even though I am a student at a university and people always tell me that this is the time to travel, I made a culinary trip instead. During the last weeks I did culinary continent hopping.
 First stop was Asia (China, to be precise…a land I am familiar with….), a perfect non-threatening beginning for the trip. In my experience, Chinese love everything made of jelly. And, surprisingly, I ate the best strawberries ever back in Beijing. The dessert of choice is vegan almond milk tofu (杏仁豆腐)
For this you’ll need:
300ml almond milk
3 tbsp. sugar
almond extract
½ tsp. agar agar
Cook everything for about three minutes. Afterwards pour the mixture into mold of your choice and let it cool for a few hours. I served it with fresh strawberries…yummy.
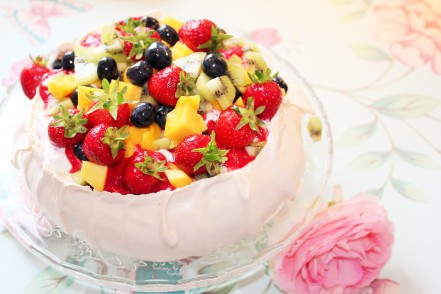 After Asia, I continued the journey to Australia. The famous Pavlova was invented here (or in New Zealand, they still argue about the origin). Pavlova is a great summer dessert as it is light, fruity and not too sweet (even though there is a lot of sugar in it).
You can use this recipe:
http://www.joyofbaking.com/Pavlova.html
(but I did not add sugar to the cream)
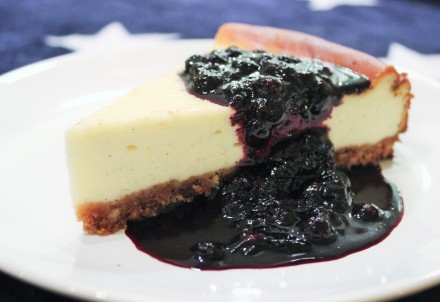 From Australia I traveled eastbound, to the US. After having been
to New York, only one dessert came to mind: New York Cheesecake. The most delicious and most caloric dessert ever.
I somehow always struggle with cheesecake. The fat is always oozing out…not too dainty. With this recipe however, the oozing was minimal and the cake super luscious (of course it was, it’s a Jamie Oliver recipe after all ;) )
http://www.jamieoliver.com/recipes/cheese-recipes/new-york-vanilla-cheesecake-with-blueberries
 After having stored the last bit of the US delicacy in my deep
freezer, I traveled on to South America. Never been there, not
too interested until now, but the empanadas with banana and
dulce de leche might just change my mind.
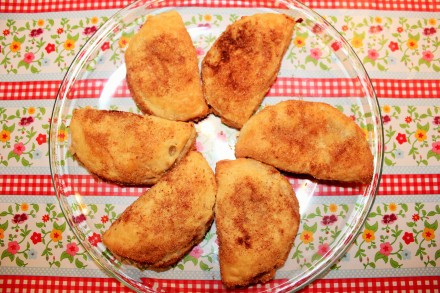
For the Empanadas you’ll need:
114 g butter
85g cream cheese
125g flour
2 EL sugar
dulce de leche (ready bought or made by cooking sweet condense milk)
2 very ripe bananas
cinnamon and sugar
Prepare the crust some days in advance at it has to rest in the fridge for several days. For the crust just knead everything until it just comes together. After a few days of chilling in the fridge, roll out the crust, cut it and fill it with mashed bananas and dulce de leche. They have to be baked at 190°C for 15-20 mins. When they are golden brown, remove them from the oven and roll them in cinnamon and sugar.
They really are a heartwarming treat on grey days.
 The last stop after returning to Europe is Morocco. I love, love, love Oriental spices, so the choice for the African continent was easy.
I made this cake as a barbeque dessert and everyone enjoyed it.
The Moroccan snake cake M’hanncha is spicy, extremely crunchy and delicately sweet. I served it with pistachio ice cream and fresh raspberries.
You can use this recipe but make sure to add spices like cardamom, cinnamon, fennel seeds, anise and nutmeg…and be easy on the rose water!: http://www.them-apples.co.uk/2012/03/mhanncha-or-the-moroccan-snake/
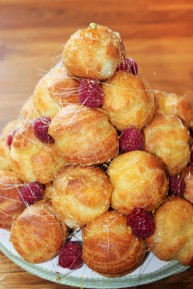
For good old Europe I decided on the French classic croquembouche … but this one you have already seen last time.
What baking project could I tackle next? I would love to hear some suggestions.
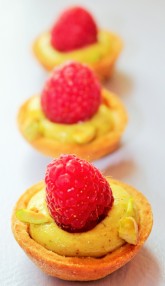
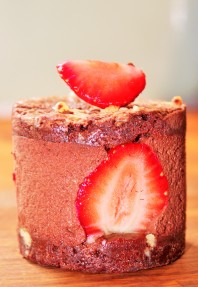
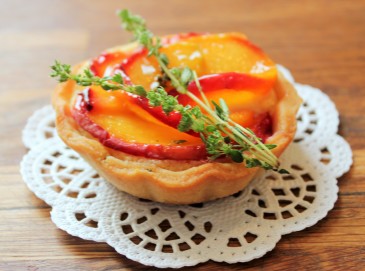
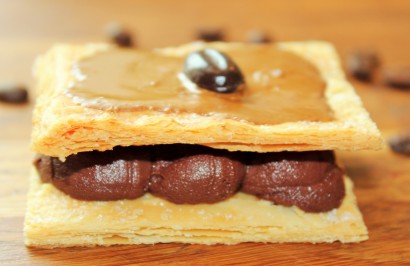
The desserts from my father’s birthday: (From left to right): Pistacchio and raspberry tartlets – Passion fruit and yoghurt delice – chocolate and strawberry cake – croquembouche – peach and thyme tartlets – mocha millefeuille
*
Being known for baking really is a double edged sword. On the one hand, I really enjoy baking and it is great to never have to worry about presents because you can always bring a cake. On the other hand, people are expecting you to bring dessert and that kind of puts pressure on me….and god forbid the cake is not great. Two weeks ago, I made dessert cakes for my father’s birthday, which is really great because he is the kind of man it is impossible to buy presents for. Anyhow, and I assume this was meant to be flattering, but as I walked in, people greeted me with phrases like: “finally, dessert is coming.” Ehm…yeah well… nice to see you, too…In addition, I have the feeling people stopped talking to me about anything else but cake…I mean really, I like cake, but it is not my raison d’être.
Enough nagging about people who like dessert (I probably should not write when my mood is on wrong side of color palette)…I mean what would I be without them? Pretty wasteful, I would say ;)

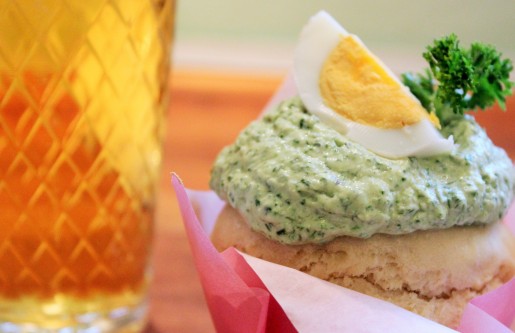 Somehow the pink phase is not really kicking in this year. It might be due to the fact that I am drowning in work (I literally am buried under piles of paper right now) or that it is the shittiest weather outside…anyhow, I hope it has just been postponed. In the meantime, I have created a tribute to a regional specialty. Sadly that specialty is green sauce and not pink… but I tried to make up for it by using a pink token muffin paper (which actually turned out to stick to the cupcake as hell…). Frankfurt green sauce (Grüne Soße or Grie Soß) is a yoghurt and sour cream based sauce, with eggs, seasoning and most importantly seven different herbs (pimpinella, borage, cress, chervil, chives, parsley and sorrel). Don’t you dare put mayonnaise, pickles, onion, or dill in it! End of discussion. The sauce is eaten cold with potatoes, eggs and sometimes boiled beef. To turn this dish into cupcakes, I made a savory potato dough, filled it with green sauce and topped it with a 7 herbs – cream cheese frosting. I served them with Frankfurt apple cider…yummy :D
Sorry, no recipe today…its top secret ;)
 Over a week has passed and I still have to deliver on my promise to post what I have baked for Mother’s Day (as I was kindly reminded yesterday).
Since it is spring, almost summer actually, I made something fitting. This time of year I spend my spare time not only baking but also with my hands in soil (I must admit, baking and digging in dirt is not the most appetizing combination ;D). I am lucky enough to have a small garden and I really enjoy seeing the plants grow. Especially the ones I can harvest.
For my Mother’s Day baking session I combined both and made cute little flower pots filled with chocolate- and cheesecake. They look very realistic since I used clay pots and real flowers. Very ambitious people could make the pot and the flower from fondant…I think they are adorable enough the way I made them, though. :D
I served them with freshly made berry compote to add a little fruity tanginess.
For 3 pots of 9cm diameter you’ll need:
Chocolate Cake
30 g butter
80 g dark chocolate
200 g flour
100 g sugar
2 TL baking powder
1 vanilla sugar
4 tblsp. cocoa
200 ml milk
2 eggs
+ 50g dark chocolate (chopped)
Cheesecake Filling
250g cream cheese (or Quark)
30g sugar
1 egg
pinch of salt
First water the clay pots for 30 mins.
In the meantime melt 80g of chocolate and the butter. While the chocolate is melting, prepare the cheesecake filling by whisking all ingredients together.
Preheat the fan oven to 180°C.
Put the milk and the eggs into a large bowl. While whisking, gradually add the slightly cooled chocolate butter mixture. Then add the dry ingredients (flour, sugar, baking powder, vanilla sugar and cocoa).
Lastly add the chopped chocolate.
Now take the clay pot from the water and put a muffin paper inside (otherwise the cake will leak). First, pour in the chocolate batter, then cheesecake filling and end with chocolate batter. Do not overfill the pots (2/3 is enough).
Bake everything for about 45 mins.
Once the cakes are cooled, even the surface by cutting off some cake. Use the leftovers for the soil by blitzing them into fine crumbs. Cover the cake-tops in jam and add the crumbs (the jam makes the crumbs stick to the cake).
Decorate with real, crafted or bought plastic flowers. To prevent the flowers from touching the cake, I first inserted a piece of straw.
The cake tasted really nice and fooled everyone. You should try eating it in public and tell me about the reactions ;)
 I am really not a big fan of Mother’s day…I don’t like the history behind it. My friend Wikipedia tells me that even the inventors (some Methodist ladies) regretted inventing it because of its commercialization. Here in Germany, it was promoted by flower shops….I always thought that was just a stupid rumor. Adding to that, there is this uncanny relation of Mother’s day and third Reich propaganda… who would want to celebrate something with such connotations?
I mean, everyone should be respected and appreciated anyway….right?
But there is this societal pressure. The ads tell us that if you love your mother, you have to buy her chocolates or flowers. And to be honest, if you decide not to, even if it is justified with the most rational arguments, you probably hurt your mother, because everyone else will celebrate Mother’s day (it’s like being against Valentine’s day and secretly being jealous of people covered in rose petals).
To cut a long story short, I will bake something for Mother’s day because I want my mother to be happy. And so should you… but no pressure ;)
Here’s my suggestion for a delicious Mother’s day coffee:
Strawberry Mousse Charlotte
For a 24cm backing tin or a dome
Sponge cake:
8 eggs
150g sugar
50g melted Butter
150g flour
+ vanilla
+strawberry jam
First, separate the egg whites and yolks.
Put the egg yolks, some vanilla and 50g of sugar into a large bowl and mix it until it is thick and fluffy. This takes some time, so don’t rush it.
In the meantime you can melt the butter and set it aside.
Preheat the fan oven to 180°C.
Once the egg yolks are ready, mix the egg whites with 100g of sugar and a pinch of salt until they are stiff.
Now, add the butter to the egg yolks (first, add some egg yolks to the butter in order to lighten up the butter, then add the mixture to the remaining egg yolks)
Carefully fold in the egg whites. When they are just combined, sift and fold in the flour.
Evenly spread the batter over two lined baking trays and bake them until they are golden (10-15mins).
Turn the finished sponges around, so you can remove the baking paper. Turn them again, so the golden side is facing you. Spread the strawberry jam on the sponges and roll them up. Wrap them tightly into cling foil and let them rest for some time so they stay in shape.
Once they are completely cooled, cut them into 0,5 cm thick discs.
First, line a round bowl with cling foil, then with the sponge cake discs (you need some of the discs for covering the mousse later). Try to really put them as close together as possible so the mousse will not leak.
Strawberry Mousse
300g strawberry puree
200g yoghurt
8 leaves gelatin
140g egg whites (4-5 eggs)
100g sugar
pinch of salt
200g whipped cream
+ strawberry chunks
First, soak the gelatin in cold water and set it aside.
Blend the strawberries and mix them with the yoghurt in a large bowl.
Whip the cream and store it in the fridge.
Beat the egg whites, the sugar and the salt until they’re stiff.
Gently squeeze the gelatin and melt it in a small pan on low heat. Quickly add the gelatin to the strawberry puree. First, fold in the whipped cream, then the stiff egg whites.
Fill the mousse into the sponge lined bowl, add some strawberry pieces and cover the mousse with the left over sponge discs.
Store everything in the fridge for several hours (best overnight).
Turn the bowl upside down, remove the cling foil and decorate the dome. I used some flowers from the garden (make sure they are not poisonous).
I made the Charlotte for my step aunt’s birthday but I think it is a great recipe for a mother’s day. I Promise it seems more complicated than it actually is.
So, have a nice weekend and a delicious mother’s day.
PS: What I am making for my mother will be posted next week :)
 It’s a rough time, guys….my favorite time of the year gets spoiled with work. I guess that is the price of being an adult. It really makes me sad that I struggle to keep my promise to post (and bake) on a weekly basis and I fear it will become worse as my graduation comes closer.
However, since I have handed in my latest paper just today, I am celebrating the temporal freedom with a pink cocktail creation: raspberry and rhubarb Mojito. Yummy! I named it First Kiss, because it is innocently sweet, excitingly sparkly, stimulatingly sour and a tiny bit bitter.
Here’s the recipe (try it! preferably on a sunny day)
For the rhubarb (raspberry) syrup:
500g sliced rhubarb
330g sugar
180ml water
½ lime (juice)
Handful of raspberries
Wash the rhubarb and slice it into fine pieces. Put it into a large pot and sprinkle the sugar on top. Let the rhubarb and the sugar sit for 3 hours. Add the raspberries, the water and the lime juice and cook everything on medium heat for about 20 minutes. Once the rhubarb is mushy, sift it through a fine sieve and really squeeze the mush to release its liquid. Bring the syrup to a boil again and fill it into sterilized glass bottles (I sterilized them by putting the cleaned bottles into the 100°C fan oven for about 30mins). You should get about 0,5-1 liters of syrup.
Cheers! *
PS: I promise I’ll post something baked on the weekend :)
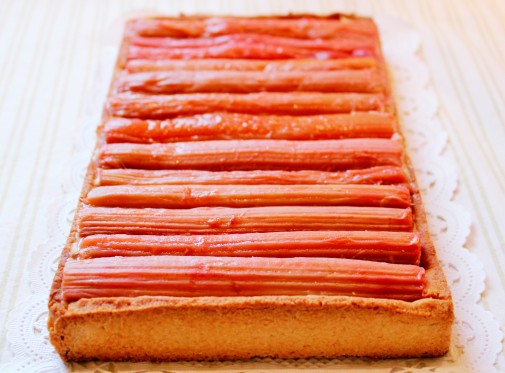 I love, love, love this time of the year because I have an excuse to become my pinkest self. In April, the time of rhubarb comes and declares the season of most delicious shades of pink open. In May, strawberries join in with their sweet taste of springtime. In June, luscious cherries, ruby currants and the most delicate raspberries mark the triumphant finale. They all are not only delicious but also healthy and look beautiful.
To pay tribute to these wonderful fruits I will use them to make pink treats until the season is over. This week I made a classic French rhubarb tarte with a crème patissiere filling. I think it looks like Paris and tastes like spring.
Rhubarb Tarte
700g Rhubarb (thin and roughly the same size)
1 vanilla pod (only the pod, the seeds are used for the crème patissiere)
50g sugar
½ lemon (juice)
A handful of frozen raspberries (for the color)
Cut the rhubarb so it neatly fits your tin. I cut it into batons of 12cm. Put the vanilla, sugar, lemon juice, raspberries and 300ml of water into a saucepan. Simmer until the sugar has dissolved. Add the Rhubarb and let it simmer for another 5 min (check so that your rhubarb does not get mushy). Remove the heat and let the rhubarb cool in the syrup.
225g flour
25g ground almonds
2tbsp icing sugar
140g chilled butter
1 large egg yolk
Blitz all ingredients together until it is crumbly. Add 1-2 tbsp of cold water and blitz again. Now, tip everything onto a working surface and bring it together to form a dough. Wrap in cling film and chill for 30 mins.
250 ml whole milk
1 vanilla pod (seeds)
4 egg yolks
2 tbsp sugar
1 tbsp corn flour
1 tbsp flour
100 ml double cream
For the crème patissiere, mix the 4 egg yolks, the two flours and 2 tbsp. of cold milk together in a bowl. Bring the rest of the milk, the vanilla and sugar to a boil. Once it boils, pour it over the egg yolk mixture and whisk everything (be careful not to make scrambled eggs). Put everything back into the sauce pan over a low-medium heat and let it thicken until it has a custardy consistency. Put the crème into a clean bowl, cover with cling film and let it cool.
Remove the pastry from the fridge and roll it out to 1mm thickness on a lightly floured surface. Line a 12 x 35cm fluted rectangular tart tin with the pastry. Chill again for 30 mins.
Heat the oven to 200°C. Remove the pastry case from the fridge, line with baking parchment and fill with baking beans. Blind-bake for 20 mins, then remove the parchment and beans, and continue baking for 8 mins more until pale golden.
Remove the rhubarb pieces from their syrup and set aside. To finish the crème patissiere, whisk the cream until it holds soft peaks and fold this into the chilled mixture.
Remove the cooled pastry case from the tin, fill it with the crème and line up the rhubarb on top. Reduce the syrup until it is thick and glaze the rhubarb. It should be chilled for 30 min before serving.
And now, take a piece and eat it while enjoying the warm spring sun :)

